Efficiency is key in the fast-paced world of design and publishing. Designers and production staff need to use the tools available to perform repetitive tasks quickly and easily. Fortunately, InDesign offers ways to customize your work environment so you can complete such tasks faster. You can create custom workspaces, turn toolbars and panels on and off, create keyboard shortcuts, and customize menus to create an environment that is personalized, streamlined, and efficient. Here’s how to work with two of those features: keyboard shortcuts and menu customization.
Keyboard Shortcuts
InDesign allows for the creation of customized keyboard shortcut sets that are based on the existing default sets within the program. The application includes an InDesign set, which are all the keyboard shortcuts specified by Adobe as the standard for InDesign, as well as sets based on QuarkXPress 4.0 and PageMaker 7.0 for those users who are partial to older habits.
Users typically retain InDesign’s default keyboard shortcuts in addition to creating new ones. For shared workstations, this ensures that all users can still use the same default shortcuts and any custom sets as well. If needed, default sets can be modified.
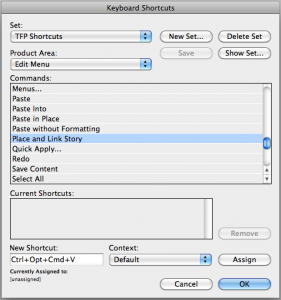
The example below shows how to create a keyboard shortcut for the Place and Link command in a new shortcut set.
Create a Keyboard Shortcut
1. Select Edit>Keyboard Shortcuts.
2. Select the New Set button.
3. Enter a name for the set and choose an existing set to base the new one on. Click OK.
4. Select Edit Menu from the Product Area drop-down menu.
5. Select the desired option from the Command list; Place and Link Story is selected in this example.
6. Type a new shortcut keystroke combination. In this example, CTL-OPT-CMD-V has been entered. If the keyboard command is already assigned, that will be indicated below the Currently Assigned To area. If the command is not assigned, [unassigned] will appear below the Currently Assigned To area.
7. Select OK.
Menu Customization
The Menus feature let you customize menus by removing rarely used commands or color-coding specific commands.
Customize a Menu
1. Select Edit>Menus.
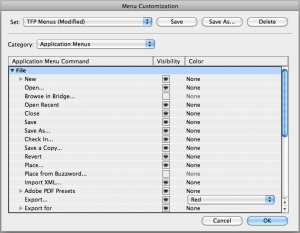
2. In the Category drop-down list, select Application Menus.
3. Click the triangle next to the menu name where the command to be modified is located. Scroll down to find the command.
4. Click on the eye icon to hide an item from the menu (our example hides “Browse in Bridge” and “Place from Buzzword”), or select the Color drop-down menu to choose a color for the item (our example adds red to the Export command).
5. Repeat as desired for other menu items. Note that switching the Category drop-down to Context & Panel Menus allows the modification of items under those menus.
6. Use the Save As option to save a set of menu customizations under a specified name.
7. Click OK when done.
Try using these handy tools to help you create your own personalized work environment!
For other great tips on using InDesign, sign up for our newsletter here. Want to learn even more and become an expert? Check out our handbooks at www.tech4pub.com/products.
Posted by: Monica Murphy


