With InDesign CS6, users now have the ability to easily copy, paste, and create links between objects when repurposing content for alternate layouts within a document or in different documents. A significant new feature that’s included is style mapping.
Similar to the custom-mapping feature available when importing files from applications like Word, this new feature allows for the mapping of Character and Paragraph styles within linked text objects. When you map your styles for use in alternate layouts, the process of restyling your text objects will require less manipulation and take less time. Custom Style Mapping can be accessed through the Content Conveyor or by opening the Link Options dialog through the Links panel menu.
The basic mapping strategies are as follows:
- Style to Style is the most basic mapping of one style to another.
- Style Group to Style Group can be used if style names are the same in both groups, but the style definitions can be different.
- Style to Style Group will map a style to a style of the same name within the style group.
- Style Group to Style changes all styles from a group to a single style.
The example below explains the process for style-to-style mapping. It also makes reference to style groups, which can be used in style mapping as well.
Map Styles
- Select the text item to be placed and linked, by selecting the Text tool and placing the cursor within the text, or by selecting the text frame using the Selection tool.
- Select Edit>Place and Link. This will open the Content Conveyor.

- Open the target document into which the selected text item will be placed and linked. This needs to be the active document during this process.
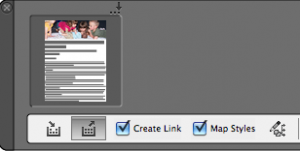
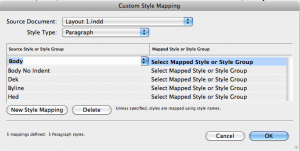
- In the Content Conveyor, select the Map Styles checkbox and then click the Edit Custom Style Mapping icon. This will open the Custom Style Mapping dialog.
- From the Source Document drop-down menu, select the name of the document from which the text is being copied.
- Click on the New Style Mapping button. Click on Select Source Style or Style Group on the left side of the dialog to reveal a drop-down menu containing the styles and style groups available in the source document.
- Select the style or style group to map from. In this example, the body style in the Layout 1 style group has been selected.

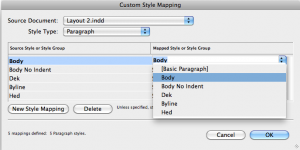
- From the Source Document drop-down menu, select the name of the target document into which you will place and link the text. Click on Select Mapped Style or Style Group in the right-hand column in the dialog to reveal a drop-down menu containing the styles and style groups available in the target document.

- Select the style or style group to map to.
- Continue to click on the New Style Mapping button, and map all necessary styles and style groups.
- Click OK.
- Making sure that the Map Styles option is checked, place the collected content in the target document.
If your workflow includes repurposing content, try Custom Style Mapping to help you streamline this process!
For other great tips on using InDesign, sign up for the TFP newsletter. Want to learn even more and become an expert? Check out our handbooks at www.tech4pub.com/products.
Posted by: Monica Murphy


